If you've spent any time browsing the internet searching out how to make your mixes better, you've no doubt come across the term "parallel compression". It's something anyone who mixes should understand and be able to apply in their mixes. Let's explore the basic concept of parallel compression and how to set it up in your DAW.
Before we begin, let me say parallel compression is NOT simply a wet/dry knob. In response to the growing interest in parallel compression, a few companies have begun including wet/dry knobs in their circuits. The problem with this trend is that parallel compression is a very specific signal routing technique, and there is no guarantee that the circuitry of the wet/dry knob is either: a) executed properly; or b) even parallel compression at all. For true parallel compression, you should route the signals in your console or DAW.
What is parallel compression? Simply put, it's "upward" compression. Traditional compression removes or attenuates the peaks within a signal. With parallel compression, you blend two routed versions of the signal - one signal with no compression and the other signal with heavy compression. The heavily compressed signal is void of peaks and maintains the lower level part of the signal. When blended with the uncompressed signal, level is added to the quieter component of the signal giving it a larger sound while maintaining the original peaks and dynamics. Rather than quieting the peaks, you're adding signal level and "lifting" the quieter component of the signal resulting in “upward” compression.
Cool? Well, let's learn how to set it up! It's actually super easy.
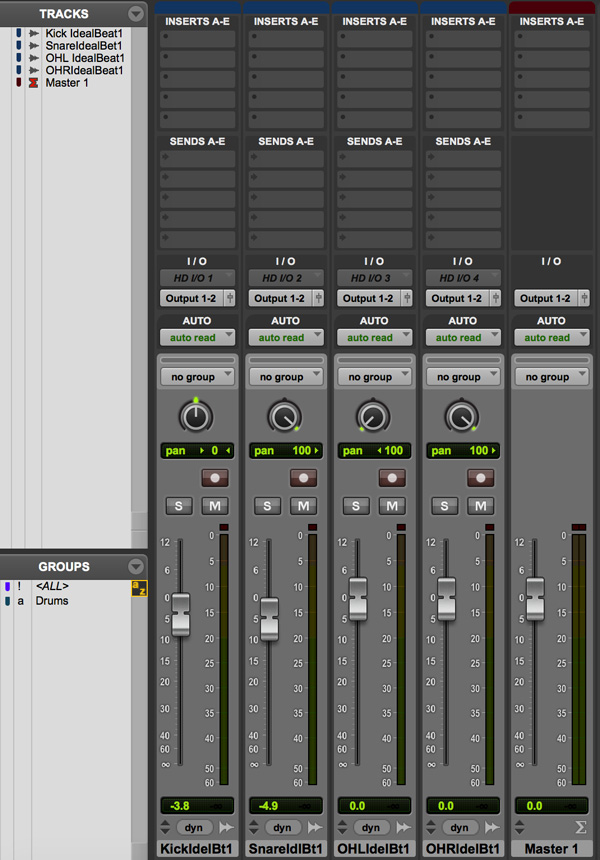
Here is a basic drum session. There are four mono tracks: kick drum, snare drum, overhead left, and overhead right. These tracks are all set to output 1-2, our monitors, which are routed through a stereo master fader.
STEP 1 - Add and Route an AUX Track
We’ll start by bussing all of the drums to a stereo AUX track. The AUX is stereo since we want to maintain the stereo panning of the original drum tracks. If the original tracks were mono, you could add a mono AUX track. If you wanted to add parallel compression to only one track, you would skip this step altogether.
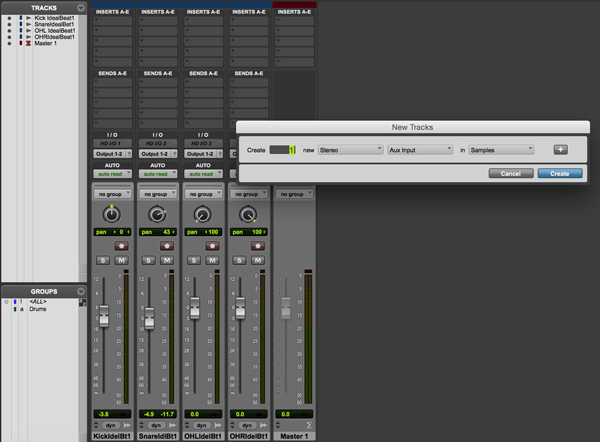
Next, you'll want to properly route your tracks through the AUX track.
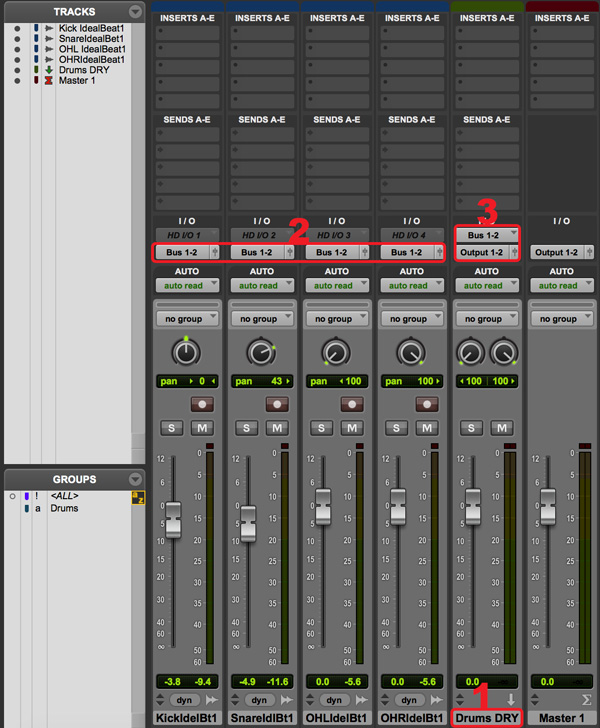
- Start by giving your AUX a name that makes sense to you. We've called ours "Drums Dry" because this AUX will control the dry uncompressed drum portion of the parallel compression setup.
- Second, we've re-assigned all of the outputs of our drum tracks from output 1-2 to unused bus outputs (select all the tracks and use OPTION-SHIFT to assign all at once). In this case, bus 1-2.
- Third, we assigned the input of the new Drums Dry AUX to bus 1-2 and assigned the output of the AUX to output 1-2. Now all of the drum tracks run through the AUX and the AUX fader can control the overall level.
This is an alternative to the "group" function. As you can see in the images, we have a drum group. However it's not active, so just ignore it. Sending a sub mix, in this case the drums, through an AUX or a group is always a good practice, regardless of whether you are using parallel compression or not. It allows you to control the overall level of the sub mix without having to adjust the individual track faders once they are mixed. In the case of an AUX, it also allows you to add effects to the sub mix. We will not be adding compression to this AUX since it is our dry sub mix, but you could add EQ if you wanted.
STEP 2 - Add and Route a Second AUX Track
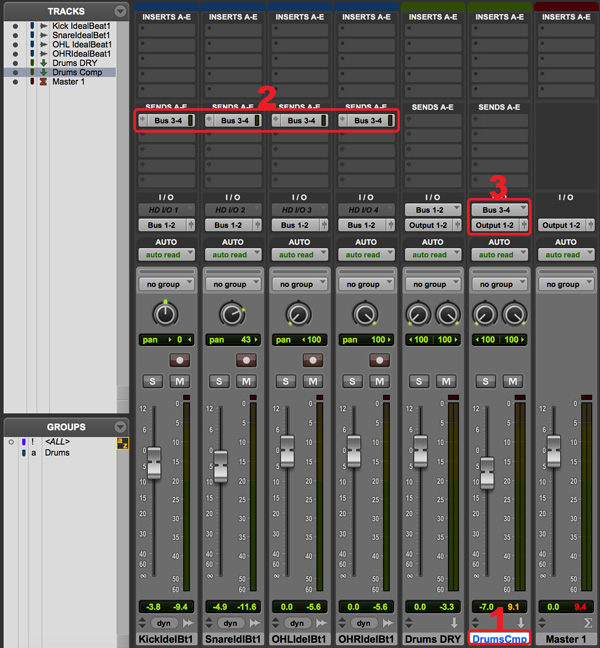
Now we need to add a second AUX track, just like we did before, and give it a name that makes sense to you.
- This track will be the compressed portion of the parallel mix, so we're going to name it "Drums Cmp".
- Next, we'll add sends to each of the four drum tracks using an open bus. In this case we've used bus 3-4 (select all then OPTION-SHIFT). Then, we'll assign the input of the new Drums Cmp AUX to that bus 3-4 and assign the output of the AUX to output 1-2. If you were adding parallel compression to a mono track, this would be the only AUX you would need to create and it would be mono.
- Last, but very important, you'll need to open all the send faders one at a time and set the fader to unity gain (OPTION-Click Fader) and select “pre” fader. Even better, you can do them all at once by selecting all four drum tracks, clicking one of the sends, and setting the fader and pre function while using OPTION-SHIFT.
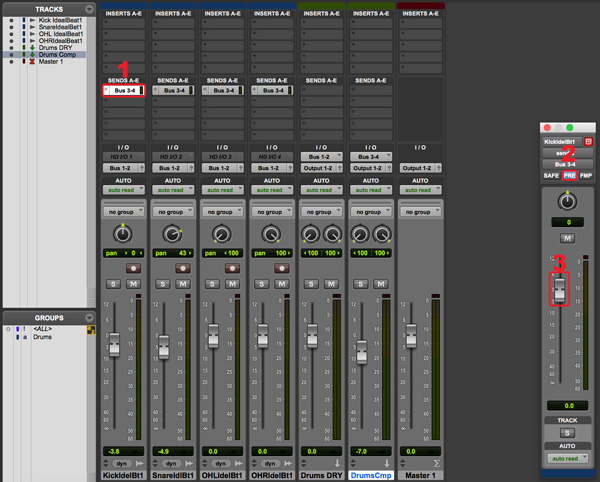
STEP 3 - Add and Set-Up a Compressor Fool!
Now you can add compression to the "Drums Cmp" AUX. For the sake of this visual tutorial, we'll add a multi-channel software compressor, but of course you should always add a hardware compressor ;).
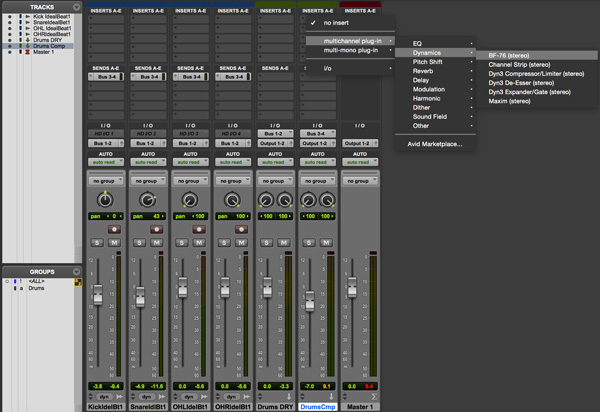
For your hardware compressors, you would route the compressor(s) to your available converter input and outputs. You'd then add the compressor(s) by selecting them under INSERT->I/O and select the converter ins and outs you have assigned to your compressor(s). Our next tutorial will focus on adding hardware inserts in detail.
If you were adding a parallel compression to a mono track, you'd have a mono AUX and would only need to assign a mono software compressor or a single hardware compressor.
Now set-up your compressor for limiting. You want to squash the hell out of this signal and eliminate all peaks leaving only the lower level uncompressed signal. There is no correct way to do this, it's really up to you and you should experiment. In our case we've set an 1176 plugin to 20:1 ratio, fastest attack and release, and hit the input hard.
Now's the fun part! Simply increase your "Drums Comp" fader to add parallel compression.
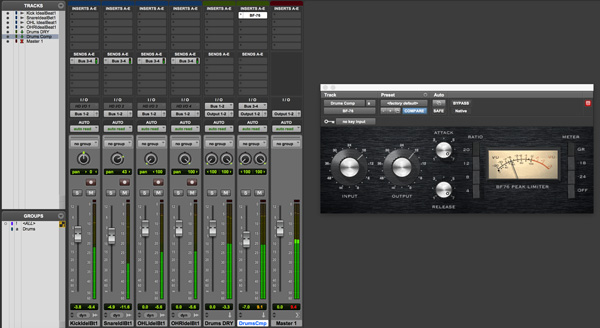
As you increase the fader, you'll hear the compressed fill you sub-mix fill from the bottom.
One important note worth mentioning with DAW processing is latency on the compressed AUX. Be aware of any latency causing phase issues in your mix and adjust your DAW or AD/DA converter delay compensation accordingly. One trick to avoid phase issues is to add a compressor to the dry AUX but leave it in bypass mode. However, most modern DAWs have built-in, simple, and easy to use delay compensation tools.
TapeOp's Larry Crane has a great video overview of parallel compression if you want to hear how it can be used in a mix. Check it out below.
